About Me

My photo
JHC Technology is a Service Disabled, Veteran-Owned, Small Business based in the Washington, DC Metro area. Our primary focus is to offer customized solutions and IT consulting to our Commercial and Government clients. Our experts have a broad experience delivering and managing Microsoft Enterprise applications and Cloud and Virtualization Solutions, as well as mobilizing Enterprise data.

Wednesday, July 31, 2013

Cloud This, Cloud That…Now What?

Everyone nowadays is talking about Cloud. What it can do for your business, regardless of your business size, how it can lead to increased efficiency, cost savings, and a more mobile workforce. While there are many aspects and benefits to leveraging a Cloud solution for both businesses and Government, there is one aspect few Cloud solution providers are actually addressing. What do I do with my old hardware and datacenter assets now?

Many companies and Government agencies have spent millions of dollars building and maintaining large datacenters from where all their IT operations centered. With the talk of Cloud and more and more organizations jumping on the bandwagon, it begs the question of what these agencies are doing about their old hardware. It’s almost painful to think that Cloud makes the traditional datacenter on which these organizations ran their IT operations practically useless, and of the millions of dollars that have been invested already as being “lost”. Perhaps this is one reason why CFO’s look back at their datacenter operations and cost statements with a bitter taste when they think about Cloud and realizing that their major investment will soon be a thing of the past.

However, for all those CFOs and out there, all hope is not lost. As part of our on-going efforts to provide end-to-end Cloud services and solutions, JHC Technology is now offering our clients with a full cycle IT asset management option that allows for the recycling of physical infrastructure assets. So while you may be thinking about what it will cost to move to the Cloud, its clear skies when you realize the long term cost savings, not just in infrastructure, but also for your entire IT operations.

In managing the logistics of a full hardware lifecycle and recycling program, JHC Technology can provide the final step to a full Cloud implementation by assisting our clients with IT asset management. This comprises services that include:

  • Removal of IT assets
  • Inventory services and data collection for the warehouse and on-site locations
  • Market value for all IT assets removed
  • Complete data destruction
  • No-landfill recycling

By being able to provide our customers and partners with a hardware recycling program, JHC Technology is able to recover the market value cost of the recycled assets for our clients to utilize towards their Amazon Web Services infrastructure costs. So while organizations may have invested millions into a traditional datacenter, having the option to liquidate those assets and know that the cash generated can run a Cloud infrastructure for years to come will make every CFO sleep soundly.

In addition, with a no-landfill policy, we are committed to providing a truly green solution, reducing our customers' overall information technology footprint. Just another reason to Cloud it.

Wendy Dueri is the Director of Business Operations for JHC Technology.  She can be reached at wdueri(at)jhctechnology.com or connect with her on LinkedIn.

Monday, July 29, 2013

Setting & Configuring Nessus to Secure Your Home Network

If you believe that patching your home network keeps you safe from malicious attacks you are partially correct. Let me explain why.  Do you know what you have installed on your computer, mobile devices or your network devices?

Sometimes software opens up things on your computer that you didn’t even know about.  For instance, if you installed a type of software that allows you to stream media inside and outside your network you basically have a port or several ports open on that system.

Do you know how many ports your computer has the ability to use?  That’s homework for you.
If your system(s) is connect to a network it needs specific ports to work correctly. If your system is on the Internet, you definitely need a few ports. This means that those ports are subject for an attack.

So how secure are these ports, and if they are not, how can you tell? You are in luck. Here is one way that you can get to the bottom of this issue.

First you need to download Nessus Vulnerability Scanner Home Edition (http://www.tenable.com/products/nessus). If you wish to get extra features with support you can purchase the Pro Feed Edition. You will need to activate your Nessus scanner so make sure you follow the procedure to activate it prior to following the steps below. 

So now it is installed. Lets get started.

  1. Open up a browser and navigate to https:/localhost:8834 
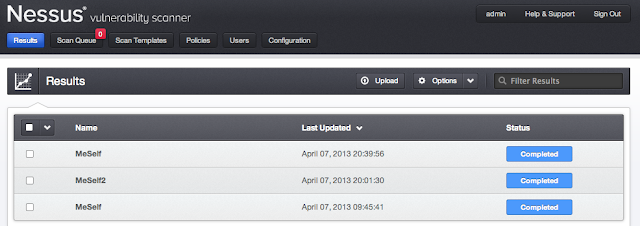
  1. When you installed you should have been prompted to set login and password. Once logged in you should see the menus and buttons for: Results, Scan Queue, Scan Templates, Policies, Users, and Configuration
  1. Now, you need to start creating Scan Templates, but before you do that, you first need to define your policies. Generally, I like to set up policies based on my target systems

    A policy in Nessus is basically a set of prewritten code that is programmed to check for specific vulnerabilities.  There are numerous individual plugins that already come with the program. However, you are welcome to write your own checks as well. There are guides to help you out with that.  So if I pick a specific plugin to check for that single vulnerability it will check for just that.  For example, one plugin could be checking for Microsoft patch MS12-036 and Nessus gives it plugin ID of 59980, your scan will only check for that.

    However, for our purposes today we want to check for everything. Checking for everything will give you a good idea how things are with your network.

To add a new policy:
a. Click on  + New Policy button.


b. Name your scan policy
c. Click on the Credentials tab


If you are scanning Windows you can choose Windows credentials. If your targets are Linux/Unix based system you should set SSH credentials. Don’t forget, those credentials have to exist on your target system.
d. Now click on Plugins and take a look at all the plugin families. Those appear next to the green enable button.  To the right is the number of plugins that are in that family. As you can see there are plenty to choose from. Click on the names and browse around to get familiar with what types of checks it will be doing.  Click the family enable buttons as well as the plugin enable buttons in blue and notice what happens. 


e. Make sure you turn them all to green and enable for this initial scan.
f. The last tab, Preferences, we will leave alone today.
g. Make sure you click the Update button at the bottom and it should take you back to the main policy page.


  1. So now that you have a policy, it is time to create a Scan Template.
  1. Click on San Templates button at the top.
  2. Click on + New Scan Button to create a new template


  1. After you click to create a new scan template you should see the following:

  1. Make sure you name the scan
  2. Click the drop down Type and it will drop down 3 options.  Select Template


  1. After you select Template, click on the drop down for Policy.  Make sure you select the policy you just created.

  1. There will be a large box next to Scan targets.  There you will type the IP range your network is in.  (e.g. 192.168.1.1/24 , 192.168.100.1-200). Just make sure you have the right range.

  1. Click Create Template button.

    Now, you should see your new template listed in the Scan Templates tab.

  1. To run the scan:
    1. hover your curser to the right of the scan template.
    2. You should see a small triangle, click on it. 
    3. It may show a bubble that reads, Run This Template.
    4. You will be prompted to make sure you want to run the scan. If so, click Launch.


You should now see the scan start and the status should display “Running” with a percentage bar.


  1. To review your scan:
    1. Click on the Results button at the top
    2. You will see the scan name, with date and status of it.
    3. Click on the scan to open it and you should see something like this:


*Please note that I pulled results of an old sample system. 
    1. Click on the IP/bar to review details of the scan
    2. There you will be able to review each item found.

Nessus rates the finding in 5 severity levels.  Critical, High, Medium, low and informational.  You may agree or not agree on the severity level, but it is always good to review the ones with higher severity.

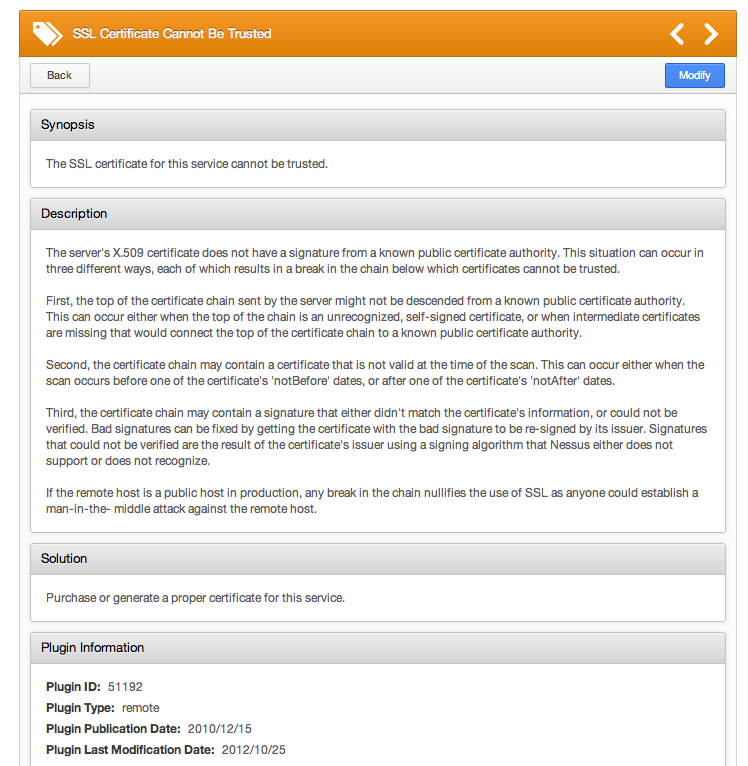
If you click on each one you can review details of each finding. In this example the finding is an SSL Certificate Cannot Be Trusted.

Within the details of the findings Nessus provides you with possible solutions. Please note that this is not the case for every finding.  Sometimes, it may involve upgrading software or installing a patch. However, you may find that some solutions may involve changing configurations as well.  If you find yourself not knowing what to do, you could use the power of Google to research possible solutions. 


By paying attention to these items and resolving them early on, you can secure your home network and take active steps towards protecting your data and devices.

If you have questions on any scan setup or even fixes, you are welcome to send an e-mail and I could write the solution as a future blog. My contact details are located below.

Ernesto Fuller is the Senior Security Administrator for JHC Technology.  He can be reached at efuller(at)jhctechnology.com or connect with him on LinkedIn.

Wednesday, July 17, 2013

Various Ways to Recover Deleted Emails

Oops! We’ve all done this. We’ve all hit the delete button way too soon when deleting that 100th email from your Inbox. Suddenly, you realize that your boss’ request to put the finishing touches on that huge project that you’ve been working on was the 99th email. But don’t panic. There are ways to recover emails that have been deleted, even permanently. And no, it does not involve your boss resending that very important email again.

Step 1: Check Your Deleted Items Folder

Every Outlook client mailbox comes with a deleted items folder. So any mail items deleted (email, calendar events, appointments, etc.) will always be forwarded to this deleted items folder. This is known as a soft delete.

To recover recently deleted items within the Outlook mailbox, select the Deleted Items folder. Once you are within your deleted items, you can sort by date, sender or type of message to find the mail item that you’re looking for.

But let’s say that you deleted your deleted items. Now what?

Step 2: Recover Deleted Items

MS Outlook client has a Recover Deleted Items Tool that allows you to recover mail items that have been deleted from the deleted items folder. To recover deleted items on the client:

a.       Select the Deleted Items folder,

b.      On the Tools menu, click Recover Deleted Items (this will be under the Folder tab in Outlook 2010)

c.       Highlight the deleted items you wish to recover

d.      Select the Recover Selected Items icon. Your selected items will now be restored to the Deleted Items folder.

Wonderful news, right? But what if you permanently deleted your deleted items? This means that at some point, you held down the shift key while selecting delete, or what’s known as a hard delete. Now your deleted mail items are no longer recoverable from the deleted items folder or by using the Recover Deleted items tool.

Step 3: Recover Deleted Items via Exchange

Most businesses have an MS Exchange environment where email items are retained for at least two weeks before being physically deleted from the Information Store. This is referred to as the Deleted Items Retention Policy. However, these deleted items are hidden from the MS Outlook client and must be recovered by an administrator with Exchange Admin rights. An Exchange Administrator gathers information needed to perform a Single Item Recovery. The Exchange Administrator then searches the "Dumpster" of the mail server. This is where purged or deleted items are located before being physically deleted from the Information Store via the Deleted Items Retention Policy. Once the deleted item is found, a .PST file can be created containing the missing mail items. The .pst file is then imported into the user’s mailbox, thus restoring the missing email.

Step 4: Exchange Backups

Last but not least, is the option to restore a user’s email using a Point-in-Time recovery Exchange Restore. Stick around for my next blog as we go through the task of a mailbox restore using a third party backup, restore and archive recovery tool.

Jeronna Freeman  is the Cloud Administrator for JHC Technology.  She can be reached at jfreeman(at)jhctechnology.com or connect with her on LinkedIn.

Thursday, July 11, 2013

How to Clear an Enterprise Password from a BlackBerry

As you may already know, once a BlackBerry device has been activated on a BlackBerry Enterprise Server the IT Policy is "hard coded," so to speak, on that device. If your organization, for whatever reason, wishes to allow users to keep these devices without the password, the tool JL_Cmder.cmd is a Windows Command Script (.cmd) that will do the trick. There are other important troubleshooting features included as well.

Recently I was faced with 4 different BlackBerry devices that received a white screen 603 error or error 507 after the carrier pushed out an upgrade. The solution provided to me by the vendor did not resolve the issue.

To fix it, I ran the JL_Cmder.cmd against the device, selected option number 5) resettofactory (see the screen shots below). Once completed, all the user data and IT Policy are wiped. I then had to recover the OS and was able to successfully reactivate the BlackBerry and restore with the backup files. Prior to running the .cmd, be sure to backup and save your data to your Backup files:

  1. Connect the BlackBerry with the USB cable.
  2. If you did not already install FREE RIM BlackBerry Desktop Software, go to http://us.blackberry.com/software/desktop.html and install the software in order to Backup up all the data on the device.
  3. Once you have any data you would like to restore saved within your Backup file you are ready to run Execute

  4. Follow the screen prompts and enter the password if the device has one currently 

  5. Select 5) resettofactory

  6. You will be prompted with the following screen that you are about to reset the device to factory settings. Click (Y) for yes.

  7. Once this has completed, follow the onscreen steps to recover the OS and reactivate the BlackBerry.
If you have any questions or would like further information, please respond to this post or email me and I will do my best to provide you with more information in a follow-up post. 

Wanda Bannerman is the Mobile Architect for JHC Technology.  She can be reached at wbannerman(at)jhctechnology.com.

Tuesday, July 9, 2013

Migrating Legacy Content into SharePoint 2013

In my most recent client engagement I was tasked with architecting, designing and implementing a SharePoint 2013 build, but the only caveat was that my client wanted to migrate their old legacy file server.

I should feel like my name should be “Migration Dude” as I have been tasked with nothing but SharePoint –related migration work. I am referring to the task of migrating millions of documents from legacy systems into SharePoint 2010/2013. These documents can exist in Wiki’s (which have been hard-coded) to file servers that exist as Linux based to Windows Server 2000/2003/2008. You get the idea.

These days, I am finding that organizations are realizing that there is significant cost savings in leveraging SharePoint as their content management solution as well as ensuring that it is Cloud-based.

I’d like to share some of the Migration Best Practices steps that I have taken over the last couple of years that have helped me along the path to MIGRATION SUCCESS!

End User Impact – SharePoint Migration Servers
Having dedicated hardware that the migration software can exist/live on will help significantly if you have a 24/7/365 customer.  Migration software uses lots of server memory

SQL Server Impact

Heavy performance impacts are noticeable especially when VERBOSE logging is turned on turning a migration. I mean you do want to know what fails and why it failed, right? Ensure that your SQL servers are beefy enough to handle the full amount of throttle you are giving it. Time is money, and migrations are expensive

Resource Metrics - Keep an eye on Performance

Setup counters such as RAM, available disk space, Queue Length ( for the location in which the content databases will reside in). Slowness here is also called Bottle-Necking, which can ultimately affect search and your end-users’ happiness.

Happy Migrating!!!


Gary Arrington is the Cloud Consultant & SharePoint SME for JHC Technology.  He can be reached at garrington(at)jhctechnology.com or connect with him on LinkedIn.

Wednesday, July 3, 2013

What the Cloud Isn’t

We hear so often about all the things that the Cloud is, all the business challenges that Cloud solves, all the networking that Cloud offers, and all the benefits of jumping on board now.  Yet, even with all the talk about what Cloud offers, there is still so much about the Cloud that potential users are failing to understand.  This is a chance to talk about what the Cloud isn’t.
  • The Cloud isn’t one big data center in Topeka, Kansas – Google, Amazon Web Services, Microsoft, Rackspace, and VMWare don’t all operate out of one giant data center somewhere.  The Cloud isn’t one thing.  Microsoft’s Cloud is not the same as AWS’ Cloud, which isn’t the same as Google’s Cloud.  The Cloud doesn’t go down, despite the ominous headlines.  AWS, for example, has nine regions around the world.  Each of those regions has, at a minimum, two Availability Zones.  Each Availability Zone is an independent data center.  In fact, AWS has 25 independent data centers around the world.  What happens at one doesn’t happen at them all.
  • The Cloud isn’t a panacea – Simply moving to the Cloud isn’t the beginning and end of the discussion.  Putting storage in the Cloud isn’t the answer, in and of itself.  The Cloud gives you options you’ve never had before, but it isn’t plug-and-play.  If you’re going to leverage the Cloud, you need to architect appropriately.  If you design failover in your own datacenter, you need to design failover in the Cloud.  You’re still building a datacenter, you’re just not doing it on-premises and with the thousands, or hundreds of thousands of dollars in up-front capital expenditure.  The Cloud can handle all of your data needs, even the PII data, but it’s not a place where you can put all your eggs in one basket and walk away.
  • The Cloud isn’t insecure – Cloud technology in many places is defaulted to least privilege access.  What’s that mean?  Well, it means that by default, you’re the only person that can access the infrastructure.  How about for storage?  In AWS’ S3 storage service, when you create a bucket for your items, you have to manually allow others access to that location.  How about networking?  With some Cloud vendors, you can create Virtual Private Clouds to isolate your infrastructure, build in security controls that allow only certain IP address access to services, and create user groups for employee access to only certain servers.  You have to protect your infrastructure like you did before.  If you leave the door open and the key in your new car, don’t complain to Chevrolet when it’s stolen.  If you leave ports open and security lax in your Cloud infrastructure, don’t complain to Microsoft when you’re hacked.
  • The Cloud isn’t someone else’s responsibility – As we noted before, the Cloud isn’t plug-and-play.  You can’t deploy to the Cloud then throw away your patch management strategy, your security updates procedures, or your IT governance.  Assuming you’re hosting your own infrastructure, you have to maintain it like you did before.  But it can be a lot more efficient in the Cloud.
If you haven’t gone to the Cloud yet, you need to dip your toes in the water.  Start with storage and archiving.  Find a strong Cloud services company and build the trust.  Ask them questions.  Give them use cases.  Don’t feel like you have to know Cloud front and back.  Know your business and ask us the questions.  Let your Cloud partner work with you to examine all the things the Cloud is and isn’t.

Matt Jordan is the Cloud Services Manager for JHC Technology.  He can be reached at mjordan
(at)jhctechnology.com, @matt_jhc, or connect with him on LinkedIn.
 

Monday, July 1, 2013

­­Non-Technical Cloud Barriers: What Do I ­­Do With My Datacenter?

Some of the most common questions that I receive from customers about moving to the Cloud are centered on the following: 
  • How do we justify going to Amazon Web Services (AWS) Cloud solution when we just bought new hardware for our organization? 
  • What do I do with my old hardware and datacenter?
These are actually valid questions that businesses should be asking when moving to an Infrastructure as a Service (IaaS) Cloud solution.  AWS has shown to have significant financial saving for most organization over short term and long term analysis; however, supporting current operations and translation of service from on-premise to AWS still has it’s initial investment that are not realized immediately.  JHC Technology recommends the following approaches based on specific organizational business requirements to help transition to AWS while taking advantage of previous datacenter and hardware investments.

Disaster Recovery failover, High Availability Service, and/or Network Extension

Organizations can make use of Amazon Web Services (AWS) as a disaster recovery failover, high availability service, and network extension (example: Reduce latency for remote offices).  Instead of taking the hard stance of all or nothing, organizations that have already invested into their physical datacenter hardware can still take advantage of AWS to address other business requirement.  Sample business requirements:
  • Improve disaster recovery by using AWS regions for failover
  • Enhance network performance by bring datacenter closer to the end user
  • Development and Test Labs

New Business Requirements and Hardware Refresh

It is unrealistic for some organization to move all datacenter operations 100% to the cloud in a short period of time.  Some reasons are contractual obligations, classification of content, migration complexity, and/or education/skill set of resources.  Understanding these business constraints is extremely important as your organization moves to the cloud and JHC recommends incorporating a methodology that utilizes AWS for new business requirements.  Additionally, implementing a change control process that will allow the organization too slow transition infrastructure/services to AWS during hardware refresh cycles, thus getting the most return on your physical infrastructure investment.

Recycle/Go Green

JHC Technology has designed a process that provides the logistic and recycling capability for customers to recycle/exchange physical infrastructure into financial credits that are used to offset Amazon Web Services costs.  The program is available for international and/or domestic:  Commercial, State, Local Governments, Non-Profits, and Federal Government.  This program allows our customers to recoup investment into datacenters, helping improve the environment, and assists in offsetting cost of AWS.

Check out other blogs in the Non-Technical Cloud Barrier Series.
James Hirmas is the CEO for JHC Technology.  He can be reached at jhirmas(at)jhctechnology.com, @JHC_JamesHirmas, or connect with him on LinkedIn.