
If you believe that patching your home network keeps you safe from malicious attacks you are partially correct. Let me explain why. Do you know what you have installed
on your computer, mobile devices or your network devices?
Sometimes software opens up things on your computer that you didn’t even know about.
For instance, if you installed a type of software that allows you to
stream media inside and outside your network you basically have a port or
several ports open on that system.
Do you know how many ports your
computer has the ability to use? That’s
homework for you.
If your system(s) is connect to a network it needs specific ports to work correctly. If your system is on the Internet, you definitely need a few ports. This means that those ports are subject for an attack.
If your system(s) is connect to a network it needs specific ports to work correctly. If your system is on the Internet, you definitely need a few ports. This means that those ports are subject for an attack.
So how secure are these ports, and if
they are not, how can you tell? You are in luck. Here is one way that you can
get to the bottom of this issue.
First you need to download Nessus Vulnerability Scanner Home Edition
(http://www.tenable.com/products/nessus). If you wish to get extra features
with support you can purchase the Pro Feed Edition. You will need to activate
your Nessus scanner so make sure you follow the procedure to activate it prior
to following the steps below.
So now it is installed. Lets get
started.
- Open up a browser and navigate to
https:/localhost:8834

- When you installed you should have been prompted to set login and password. Once logged in you should see the menus and buttons for: Results, Scan Queue, Scan Templates, Policies, Users, and Configuration

- Now, you need to start creating
Scan Templates, but before you do that, you first need to define your
policies. Generally, I like to set up policies based on my target systems
A policy in Nessus is basically a set of prewritten code that is programmed to check for specific vulnerabilities. There are numerous individual plugins that already come with the program. However, you are welcome to write your own checks as well. There are guides to help you out with that. So if I pick a specific plugin to check for that single vulnerability it will check for just that. For example, one plugin could be checking for Microsoft patch MS12-036 and Nessus gives it plugin ID of 59980, your scan will only check for that.
However, for our purposes today we want to check for everything. Checking for everything will give you a good idea how things are with your network.

To add a new policy:
a. Click on + New Policy button.

b. Name your scan policy

b. Name your scan policy
c. Click on the Credentials tab

If you are scanning Windows you can
choose Windows credentials. If your targets are Linux/Unix based system you
should set SSH credentials. Don’t forget, those credentials have to exist on
your target system.
d. Now click on Plugins and take a look at all the plugin families. Those appear
next to the green enable
button. To the right is the number of
plugins that are in that family. As you can see there are plenty to choose
from. Click on the names and browse around to get familiar with what types of
checks it will be doing. Click the
family enable buttons as well as the plugin enable buttons in blue and notice
what happens.

e. Make sure you turn them all to green
and enable for this initial scan.
f. The last tab, Preferences, we will
leave alone today.
g. Make sure you click the Update button at the bottom and it
should take you back to the main policy page.

- So now that you have a policy, it is time to create a Scan Template.
- Click on San Templates button at the top.
- Click on + New Scan Button to create a new template

- After you click to create a new scan template you should see the following:

- Make sure you name the scan
- Click the drop down Type and it will drop down 3 options. Select Template

- After you select Template, click on the drop down for Policy. Make sure you select the policy you just created.

- There will be a large box next to Scan targets. There you will type the IP range your network is in. (e.g. 192.168.1.1/24 , 192.168.100.1-200). Just make sure you have the right range.

- Click Create Template button.
Now, you should see your new template listed in the Scan Templates tab.

- To run the scan:
- hover your curser to the right of
the scan template.
- You should see a small triangle, click
on it.
- It may show a bubble that reads, Run This Template.
- You will be prompted to make sure
you want to run the scan. If so, click Launch.

You should now see the scan start and
the status should display “Running” with a percentage bar.

- To review your scan:
- Click on the Results button at the top
- You will see the scan name, with
date and status of it.
- Click on the scan to open it and
you should see something like this:

*Please note that I pulled results of
an old sample system.
- Click on the IP/bar to review
details of the scan
- There you will be able to review each item found.

Nessus rates the finding in 5 severity
levels. Critical, High, Medium, low and
informational. You may agree or not
agree on the severity level, but it is always good to review the ones with
higher severity.
If you click on each one you can review
details of each finding. In this example the finding is an SSL Certificate
Cannot Be Trusted.
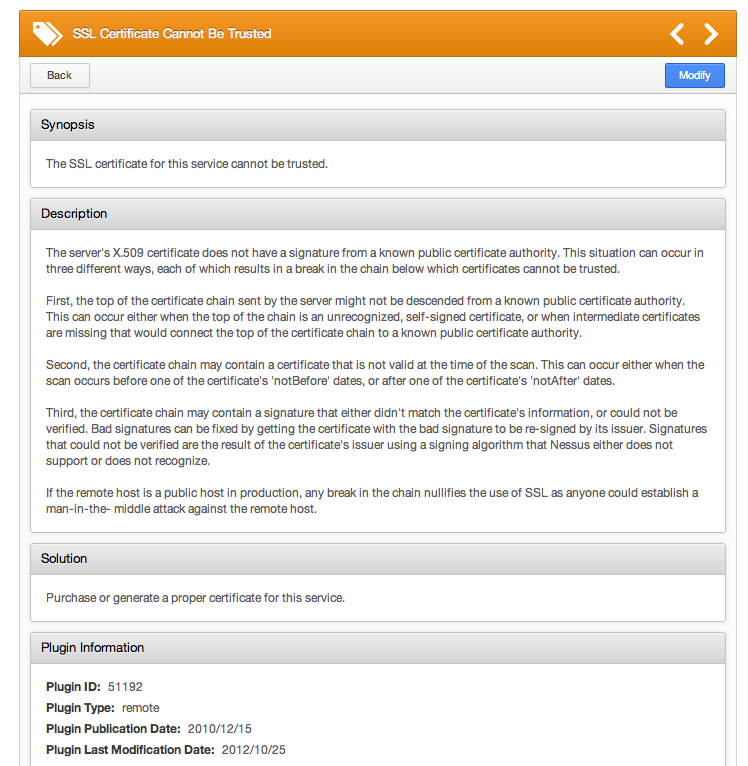
Within the details of the findings Nessus
provides you with possible solutions. Please note that this is not the case for
every finding. Sometimes, it may involve
upgrading software or installing a patch. However, you may find that some
solutions may involve changing configurations as well. If you find yourself not knowing what to do,
you could use the power of Google to research possible solutions.
By paying attention to these items and
resolving them early on, you can secure your home network and take active steps
towards protecting your data and devices.
If you have questions on any scan setup
or even fixes, you are welcome to send an e-mail and I could write the solution
as a future blog. My contact details are located below.
Ernesto Fuller is the Senior Security Administrator for JHC Technology. He can be reached at efuller(at)jhctechnology.com or connect with him on LinkedIn.
Great weblog here! Also your web site quite a bit up very fast! What web host are you using? Can I get your associate link to your host? I wish my web site loaded up as quickly as yours.
ReplyDeleteearn money online without investment
Very nice blog, you given useful information, Very great article, Thank you for sharing this wonderful article.
ReplyDeleteamazon cloud computing in india