About Me

My photo
JHC Technology is a Service Disabled, Veteran-Owned, Small Business based in the Washington, DC Metro area. Our primary focus is to offer customized solutions and IT consulting to our Commercial and Government clients. Our experts have a broad experience delivering and managing Microsoft Enterprise applications and Cloud and Virtualization Solutions, as well as mobilizing Enterprise data.
Showing posts with label Network Security. Show all posts

Tuesday, April 22, 2014

How to protect yourself from the HeartBleed Bug?

·       Change your passwords on a more regular basis
·       Sites such as Yahoo, Github, Netflix, Amazon, Paypal Cloudfront have issues new SSL certs for their sites (So these Sites should be good to go)
·        Contact the sites in which you provide some of your most sensitive/private information (financial or not) and ask questions about Heartbleed Bug.
o   Also make sure you ask what you can do to again PROTECT yourself.
Engineers and Admins with systems on AWS please refer to the following website(s) for more information…

* Red Hat: https://rhn.redhat.com/errata/RHSA-2014-0376.html
* Ubuntu: http://www.ubuntu.com/usn/usn-2165-1/

For more information about this vulnerability, please visit
* AWS Security Bulletin page: https://aws.amazon.com/security/security-bulletins/
* OpenSSL’s official advisory: https://www.openssl.org/news/secadv_20140407.txt
* The Heartbleed Bug: http://heartbleed.com/

Friday, November 22, 2013

Antivirus vs Antivirus

Do you have right Antivirus/Antimalware installed on your computer?
How many times have you received an email from someone you knew, but something about the email didn’t seem quite right? You shouldn’t trust everything you get from anyone. If you have been using a computer for sometime, you should be very well aware that having some type of antivirus is a must on your system. You should also keep that antivirus up-to-date.

How do you know you have the best and does it matter?
When it comes to antivirus, choice matters. A rule of thumb is to stick with the big boys, but they can be costly. Not all antivirus software are created equal and free doesn’t always mean better, just as expensive doesn’t always mean it will function with superiority. You should take the time to do some research on reliability, customer support and how often their product is updated.

Am I completely safe after installing antivirus software?
Once you have an antivirus installed you are ready to start scanning anything that comes in via e-mail or Internet downloads for any type of media. Your antivirus says everything is clear. More often than not, your antivirus may give you the green light, however, antivirus are not always perfect.

Chances are you may have heard of a buzzword such as zero-day. Zero-day is basically a geeky term to call a virus that may not be detected by many antivirus applications. Wouldn’t you like to have multiple antivirus applications installed on your system to cover as many types of malicious files? Unfortunately, installing more than one antivirus on a computer may cause you quite a bit of trouble. That type of software does not play well with others alike.

It’s like the old saying about oil and vinegar or better yet, it’s like beer and liquor…never been sicker. Well, having Antivirus Brand 1 and Antivirus Brand 2 installed on your system is like that. They could wreak havoc on your computer to render it useless or extremely frustrating.

Can I scan my files with multiple antivirus software that I don't need to install on my system?

Here is my tip to help you out get a better "warm fuzzy".

First, understand I am not asking you remove your antivirus installed on your computer. You need something on your system to keep you safe and you need to make sure you are keeping it up to date.

Modern day full antivirus suites scan e-mail automatically, as well as files downloaded from the Internet. I recommend keeping all foreign files in a specific folder until they have been vetted. Make sure your antivirus scans the files in that folder.

Now it’s time to scan a file with multiple scanners at the same time.

1. Virustotal (http://virustotal.com)

Open up your favorite browser and navigate to http://virustotal.com.


Click on the Choose File button and a window should pop up. Navigate to your folder where you are keeping the files in question and select 1. Finally, click the Scan It! button.

Please note that Virustotal may say it scanned a file already, but just to be on the safe side tell it to scan it again.


You should see a small window saying "file uploading". Soon after it’s done you will see that the "file is being analyzed". Right below that you will see the results trickle in. You will also notice that it is using several antivirus engines to scan your files.


It will display the antivirus brand followed by the scan result and date. That date is when that Antivirus was updated. Note that they are kept fairly up to date.

Virustotal uses about 47 different scanners. If these 47 scanners are still not enough for you, you can also try a couple of other websites that practically do the same thing.  In addition to scanning files, Virustotal also has the capability to scan URL links.

2. Jotti (http://Virusscan.jotti.org/en)

Jotti is another site just like Virustotal. Open up your browser, and go to http://virusscan.jotti.org/en:


Jotti, unlike Virustotal, lets you know up front what the server load is like. This is good if the server shows that there is a heavy load and you will have to wait or just go to another site.


The results page is simple and easy to read and also includes dates of updates and color coded font with its results.


3. Metascan (www.metascan-online.com)


Metascan uses 42-43 scanners and the results page is very similar to Virustotal and Jotti.


By using these three different options for scanning for viruses for viruses on your files you won't have to install or pay for additional software to do so. However, it is important to note that these sites are useful for scanning files only.  In addition, using these websites depends on having Internet access. Thus,  having an antivirus/antimalware scanner installed on your system is a must. Many of these applications also monitor your system memory and behavior.

Here is another link to another site, but it is not as simple as the others. However, you do have several options. If you feel comfortable give it a try:  http://anubis.iseclab.org/?action=advanced_form

Scan, be safe and prosper!

Ernesto Fuller is the Senior Security Administrator for JHC Technology.  He can be reached at efuller (at) jhctechnology.com or connect with him on LinkedIn.

Tuesday, September 17, 2013

Rubber Ducky Attack…with Simple-Ducky

This Demo is for testing purposes, not malicious activity

First, you must ask yourself, what is a Rubber Ducky and what would I use it for? The Rubber Ducky is essentially an HID (Human Interface Device).  For example, your keyboard, mouse and trackpad are HID's. Basically, a computer sees these devices differently than it would a USB thumb drive.  The mouse and keyboard in itself are non-threatening, meaning that they are not devices that would pull data from a computer and store that data. The keyboard and mouse are just simply an interface to type commands, documents or control your operating system.

Well, the Rubber Ducky is the same thing.  However, it looks like a thumb drive. The Rubber Ducky types and clicks things on your system (as if magic) and the whole time your computer thinks it is a keyboard. Below is a demonstration of how the Rubber Ducky works.

First, make sure you have the equipment and software (and Linux distro).

You can order your own Rubber Ducky here: http://hakshop.myshopify.com/products/usb-rubber-ducky


As you can see, the rubber ducky is not a USB drive, but a HID computer if you will. A HID is a Human Interface Device, much like your keyboard and mouse.


Make sure you visit this page to download the latest Simple-Ducky payload generator.
The site will explain what you need and how to install it. It is fairly simple. No pun intended.


I highly recommend you take the time to read the site and get familiar with the capacity of the payload generator software.

Also note that I used Kali Linux  for this demo.  I downloaded it here: http://www.kali.org
Kali Linux is a Debian based Linux Distro and is loaded with Security tools. It was previously known as Backtrack.

Here is a picture of my Rubber Ducky.  Looks innocent enough:


If you take it apart and see under the hood you can see that is looks simple. It also has a micro SD card slot.  You will also receive a micro SD to USB converter and a 256MB micro SD card when you order your rubber ducky.


Lets get started.

Grab your micro SD card and put it in the converter. Insert/connect the converter into your system and make sure your Linux distro sees your removable USB drive. In my case, it was automatically labeled 256MB removable.


Normally, the newer Linux distros have a quick shortcut that allows you to open the terminal (aka command prompt).


At the prompt, type in simple-ducky and hit Enter


Your menu should load up and look like this. Take some time to read all your options, especially #9:


Type "9" and hit Enter.


It will go to a series of checks and installs to make sure you have everything you need to create your own exploits/payloads.


When it is all done type "2" (Windows Reverse Shell Payloads) and Enter.
Then, you will see another menu. Again, take time to review your options.

Type in Option "3" (Persistence Reverse Shell (Win Vista/7)) and hit Enter.

There you will be prompted with a series of wizard questions to set the payload up for you.
The first question was to set username and then password:


The next question is asking for the IP of the system that your victim PC will connect to.  In this case I type 1.2.3.4 as a sample:

This next quest is in regards to what port your victim will connect on. I used 1337 in this sample.  So the victim will connect to IP 1.2.3.4 on port 1337.


You will also have to set a URL for the victim to go to, instead of the IP.  There are times where your listening server may be different than where you are creating this exploit. In this example, I name the URL www.h4ckm3-sys.com:


This next step is simply to set the time to wait to launch the exploit.  It is supposed to be set in milliseconds. I set this one in 5000 milliseconds (5 seconds).


The last question is in regards to see if you are using Kali.  If you are the software knows where to locate the ncat file and put it in the make believe webserver you just created. If you are not using Kali type n and Enter:


Now you should see the software generating the code (inject.bin file) with all the settings you just defined. Hopefully it all goes well.


You should see the files inject.bin and payload.txt in the /usr/share/simple-ducky folder. Make sure you copy the inject.bin file onto your micro SD card now, and you should review the payload.txt file.


The payload.txt is written in human readable code, so you should be able to see what it is doing.   For instance if you look at the things that are circled in the next screenshot, you can see some of the parameters that we set during the previous wizard:


You will be prompted to start listening on this machine.  In this case I said "yes" and was able to see this. It is just waiting for victim machines to make a call back.


Once you copied the inject.bin file to your drive/micro SD card, pull the card out and take the micro SD card out of the converter.


Put the micro SD card into your Rubber Ducky micro SD card slot and then insert into your victim’s pc.


If you put it back together, it should look like this. It looks like an innocent harmless USB drive.


If you connected the rubber ducky to test victim's PC you should see that it was able to connect back to the listening server.

The rubber ducky is not a USB thumb drive, but it looks like one. The sample payloads provided are good, but feel free to create your own.  You can always pair it up with other tools or software, but always keep in mind what your victim is using. You need to tailor your payloads, based on your victims OS and settings.

Thanks to Travis “Skysploit” Weather for the neat Simple-Ducky tool.

Here is another site with other payloads.  However, these payloads you have to create yourself, but the hard part is already done for you.

Have fun Rubber Ducking.

Ernesto Fuller is the Senior Security Administrator for JHC Technology.  He can be reached at efuller (at) jhctechnology.com or connect with him on LinkedIn.

Wednesday, August 7, 2013

Amazon Web Service (AWS) - Trusted Internet Connection (TIC) Architecture

I have decided to deviate from my blog series about Non-Technical Cloud Barriers and talk about some of the solution architecture work JHC is performing for our Federal clients moving to Amazon Web Services.  One of the major design hurdles the Federal Government has to take into consideration when moving into the Cloud is how to implement Trusted Internet Connection (TIC).  What is Trusted Internet Connection?  Department of Homeland Security describes TIC as an initiative to:

“…optimize and standardize the security of individual external network connections currently in use by federal agencies, including connections to the Internet. The initiative will improve the federal government's security posture and incident response capability through the reduction and consolidation of external connections and provide enhanced monitoring and situational awareness of external network connections.” (You may also refer to OMB Memorandum M-08-05).  
My understanding is that currently, no public Cloud offerings have the capability/ability to natively provide TIC for their federal clients.  In most cases, internet traffic is routed back to the federal government datacenter and out a TIC router provided by a vendor through the vendor’s Managed Trusted Internet Provider Service (MTIPS).  Currently the following vendors are the only MTIPS providers available under the Networx contract:
  • AT&T
  • CenturyLink (formerly Qwest)
  • Sprint
  • Verizon Business
For Federal Agencies looking to expand and/or move all infrastructure operations into the Cloud, but still need to maintain a physical datacenter to allow for a TIC vendor provided router, it is not cost effective and from a networking prospective it is inefficient.  Using AWS features, JHC has been able to design a TIC solution that removes the requirement for Agencies to have to maintain physical datacenters for TIC compliance while providing a TIC solution that is High Availability and has built-in Disaster Recovery.  Below is a high level overview and sample architecture of the TIC Solution:
  1. Utilize AWS Regions in US East and/or GovGloud
  2. Deploy Virtual Private Cloud (VPC) within the AWS Region and associate subnets across Availability Zones.
  3. Within your VPC deploy EC2 virtual routers and EC2 web content filters across Availability Zones for high availability and disaster recovery.
  4. Establish VPN connection between your agency and EC2 virtual router.
  5. (Optional) for additional high availability and disaster recovery connect your AWS regions via EC2 virtual router and load balance user internet traffic across the US.
  6. Use AWS Direct Connect feature to route your internet traffic to Equinix facility in either Seattle Washington and/or Ashburn, VA utilizing AWS Virtual Private Gateway.
  7. Drop TIC provider router into Equinix and connect AWS Direct Connect Router to TIC Router


James Hirmas is the CEO for JHC Technology.  He can be reached at jhirmas (at) jhctechnology.com,@JHC_JamesHirmas, or connect with him on LinkedIn.

Monday, July 29, 2013

Setting & Configuring Nessus to Secure Your Home Network

If you believe that patching your home network keeps you safe from malicious attacks you are partially correct. Let me explain why.  Do you know what you have installed on your computer, mobile devices or your network devices?

Sometimes software opens up things on your computer that you didn’t even know about.  For instance, if you installed a type of software that allows you to stream media inside and outside your network you basically have a port or several ports open on that system.

Do you know how many ports your computer has the ability to use?  That’s homework for you.
If your system(s) is connect to a network it needs specific ports to work correctly. If your system is on the Internet, you definitely need a few ports. This means that those ports are subject for an attack.

So how secure are these ports, and if they are not, how can you tell? You are in luck. Here is one way that you can get to the bottom of this issue.

First you need to download Nessus Vulnerability Scanner Home Edition (http://www.tenable.com/products/nessus). If you wish to get extra features with support you can purchase the Pro Feed Edition. You will need to activate your Nessus scanner so make sure you follow the procedure to activate it prior to following the steps below. 

So now it is installed. Lets get started.

  1. Open up a browser and navigate to https:/localhost:8834 
  1. When you installed you should have been prompted to set login and password. Once logged in you should see the menus and buttons for: Results, Scan Queue, Scan Templates, Policies, Users, and Configuration
  1. Now, you need to start creating Scan Templates, but before you do that, you first need to define your policies. Generally, I like to set up policies based on my target systems

    A policy in Nessus is basically a set of prewritten code that is programmed to check for specific vulnerabilities.  There are numerous individual plugins that already come with the program. However, you are welcome to write your own checks as well. There are guides to help you out with that.  So if I pick a specific plugin to check for that single vulnerability it will check for just that.  For example, one plugin could be checking for Microsoft patch MS12-036 and Nessus gives it plugin ID of 59980, your scan will only check for that.

    However, for our purposes today we want to check for everything. Checking for everything will give you a good idea how things are with your network.

To add a new policy:
a. Click on  + New Policy button.


b. Name your scan policy
c. Click on the Credentials tab


If you are scanning Windows you can choose Windows credentials. If your targets are Linux/Unix based system you should set SSH credentials. Don’t forget, those credentials have to exist on your target system.
d. Now click on Plugins and take a look at all the plugin families. Those appear next to the green enable button.  To the right is the number of plugins that are in that family. As you can see there are plenty to choose from. Click on the names and browse around to get familiar with what types of checks it will be doing.  Click the family enable buttons as well as the plugin enable buttons in blue and notice what happens. 


e. Make sure you turn them all to green and enable for this initial scan.
f. The last tab, Preferences, we will leave alone today.
g. Make sure you click the Update button at the bottom and it should take you back to the main policy page.


  1. So now that you have a policy, it is time to create a Scan Template.
  1. Click on San Templates button at the top.
  2. Click on + New Scan Button to create a new template


  1. After you click to create a new scan template you should see the following:

  1. Make sure you name the scan
  2. Click the drop down Type and it will drop down 3 options.  Select Template


  1. After you select Template, click on the drop down for Policy.  Make sure you select the policy you just created.

  1. There will be a large box next to Scan targets.  There you will type the IP range your network is in.  (e.g. 192.168.1.1/24 , 192.168.100.1-200). Just make sure you have the right range.

  1. Click Create Template button.

    Now, you should see your new template listed in the Scan Templates tab.

  1. To run the scan:
    1. hover your curser to the right of the scan template.
    2. You should see a small triangle, click on it. 
    3. It may show a bubble that reads, Run This Template.
    4. You will be prompted to make sure you want to run the scan. If so, click Launch.


You should now see the scan start and the status should display “Running” with a percentage bar.


  1. To review your scan:
    1. Click on the Results button at the top
    2. You will see the scan name, with date and status of it.
    3. Click on the scan to open it and you should see something like this:


*Please note that I pulled results of an old sample system. 
    1. Click on the IP/bar to review details of the scan
    2. There you will be able to review each item found.

Nessus rates the finding in 5 severity levels.  Critical, High, Medium, low and informational.  You may agree or not agree on the severity level, but it is always good to review the ones with higher severity.

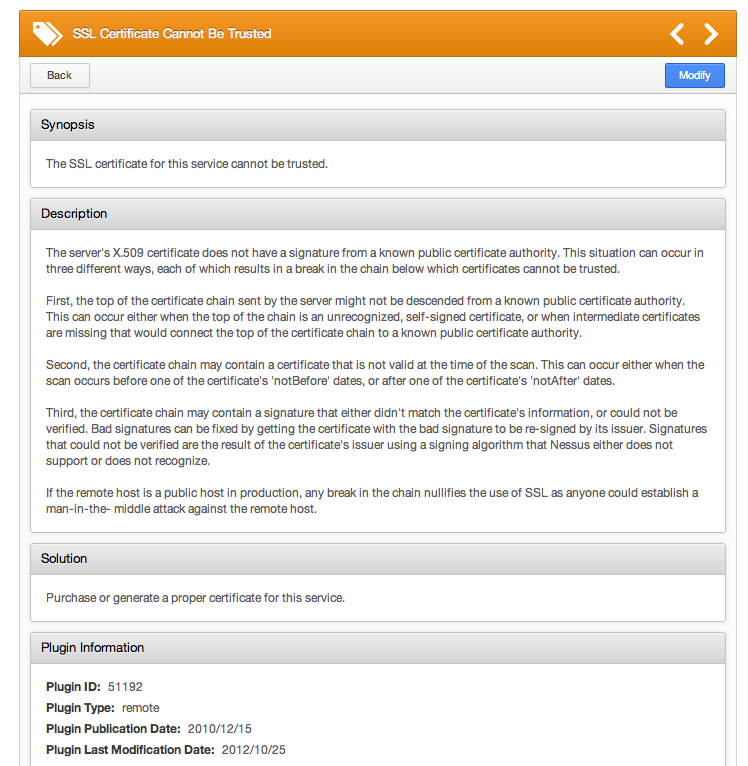
If you click on each one you can review details of each finding. In this example the finding is an SSL Certificate Cannot Be Trusted.

Within the details of the findings Nessus provides you with possible solutions. Please note that this is not the case for every finding.  Sometimes, it may involve upgrading software or installing a patch. However, you may find that some solutions may involve changing configurations as well.  If you find yourself not knowing what to do, you could use the power of Google to research possible solutions. 


By paying attention to these items and resolving them early on, you can secure your home network and take active steps towards protecting your data and devices.

If you have questions on any scan setup or even fixes, you are welcome to send an e-mail and I could write the solution as a future blog. My contact details are located below.

Ernesto Fuller is the Senior Security Administrator for JHC Technology.  He can be reached at efuller(at)jhctechnology.com or connect with him on LinkedIn.