About Me

My photo
JHC Technology is a Service Disabled, Veteran-Owned, Small Business based in the Washington, DC Metro area. Our primary focus is to offer customized solutions and IT consulting to our Commercial and Government clients. Our experts have a broad experience delivering and managing Microsoft Enterprise applications and Cloud and Virtualization Solutions, as well as mobilizing Enterprise data.
Showing posts with label Wireless. Show all posts

Monday, July 29, 2013

Setting & Configuring Nessus to Secure Your Home Network

If you believe that patching your home network keeps you safe from malicious attacks you are partially correct. Let me explain why.  Do you know what you have installed on your computer, mobile devices or your network devices?

Sometimes software opens up things on your computer that you didn’t even know about.  For instance, if you installed a type of software that allows you to stream media inside and outside your network you basically have a port or several ports open on that system.

Do you know how many ports your computer has the ability to use?  That’s homework for you.
If your system(s) is connect to a network it needs specific ports to work correctly. If your system is on the Internet, you definitely need a few ports. This means that those ports are subject for an attack.

So how secure are these ports, and if they are not, how can you tell? You are in luck. Here is one way that you can get to the bottom of this issue.

First you need to download Nessus Vulnerability Scanner Home Edition (http://www.tenable.com/products/nessus). If you wish to get extra features with support you can purchase the Pro Feed Edition. You will need to activate your Nessus scanner so make sure you follow the procedure to activate it prior to following the steps below. 

So now it is installed. Lets get started.

  1. Open up a browser and navigate to https:/localhost:8834 
  1. When you installed you should have been prompted to set login and password. Once logged in you should see the menus and buttons for: Results, Scan Queue, Scan Templates, Policies, Users, and Configuration
  1. Now, you need to start creating Scan Templates, but before you do that, you first need to define your policies. Generally, I like to set up policies based on my target systems

    A policy in Nessus is basically a set of prewritten code that is programmed to check for specific vulnerabilities.  There are numerous individual plugins that already come with the program. However, you are welcome to write your own checks as well. There are guides to help you out with that.  So if I pick a specific plugin to check for that single vulnerability it will check for just that.  For example, one plugin could be checking for Microsoft patch MS12-036 and Nessus gives it plugin ID of 59980, your scan will only check for that.

    However, for our purposes today we want to check for everything. Checking for everything will give you a good idea how things are with your network.

To add a new policy:
a. Click on  + New Policy button.


b. Name your scan policy
c. Click on the Credentials tab


If you are scanning Windows you can choose Windows credentials. If your targets are Linux/Unix based system you should set SSH credentials. Don’t forget, those credentials have to exist on your target system.
d. Now click on Plugins and take a look at all the plugin families. Those appear next to the green enable button.  To the right is the number of plugins that are in that family. As you can see there are plenty to choose from. Click on the names and browse around to get familiar with what types of checks it will be doing.  Click the family enable buttons as well as the plugin enable buttons in blue and notice what happens. 


e. Make sure you turn them all to green and enable for this initial scan.
f. The last tab, Preferences, we will leave alone today.
g. Make sure you click the Update button at the bottom and it should take you back to the main policy page.


  1. So now that you have a policy, it is time to create a Scan Template.
  1. Click on San Templates button at the top.
  2. Click on + New Scan Button to create a new template


  1. After you click to create a new scan template you should see the following:

  1. Make sure you name the scan
  2. Click the drop down Type and it will drop down 3 options.  Select Template


  1. After you select Template, click on the drop down for Policy.  Make sure you select the policy you just created.

  1. There will be a large box next to Scan targets.  There you will type the IP range your network is in.  (e.g. 192.168.1.1/24 , 192.168.100.1-200). Just make sure you have the right range.

  1. Click Create Template button.

    Now, you should see your new template listed in the Scan Templates tab.

  1. To run the scan:
    1. hover your curser to the right of the scan template.
    2. You should see a small triangle, click on it. 
    3. It may show a bubble that reads, Run This Template.
    4. You will be prompted to make sure you want to run the scan. If so, click Launch.


You should now see the scan start and the status should display “Running” with a percentage bar.


  1. To review your scan:
    1. Click on the Results button at the top
    2. You will see the scan name, with date and status of it.
    3. Click on the scan to open it and you should see something like this:


*Please note that I pulled results of an old sample system. 
    1. Click on the IP/bar to review details of the scan
    2. There you will be able to review each item found.

Nessus rates the finding in 5 severity levels.  Critical, High, Medium, low and informational.  You may agree or not agree on the severity level, but it is always good to review the ones with higher severity.

If you click on each one you can review details of each finding. In this example the finding is an SSL Certificate Cannot Be Trusted.
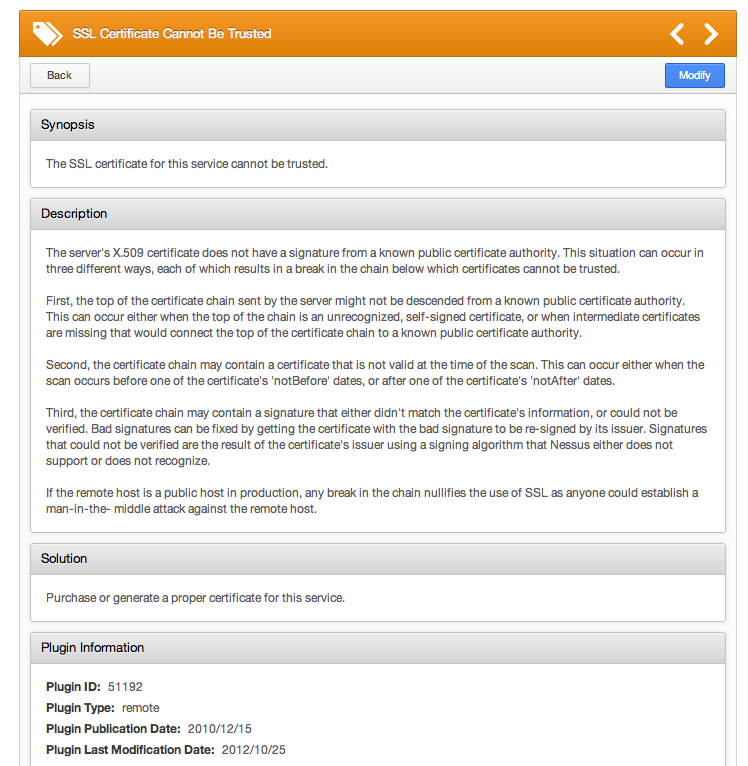
Within the details of the findings Nessus provides you with possible solutions. Please note that this is not the case for every finding.  Sometimes, it may involve upgrading software or installing a patch. However, you may find that some solutions may involve changing configurations as well.  If you find yourself not knowing what to do, you could use the power of Google to research possible solutions. 


By paying attention to these items and resolving them early on, you can secure your home network and take active steps towards protecting your data and devices.

If you have questions on any scan setup or even fixes, you are welcome to send an e-mail and I could write the solution as a future blog. My contact details are located below.

Ernesto Fuller is the Senior Security Administrator for JHC Technology.  He can be reached at efuller(at)jhctechnology.com or connect with him on LinkedIn.

Friday, June 21, 2013

Purging Your Devices

If you own a device with wireless capabilities chances are you are actively using that feature, whether you realize it or not.

OK, so let's narrow the scope down to smartphones and tablets. The top 4 popular operating systems on these devices are Android, Windows Mobile, Blackberry and Apple iOS.
I have used all 4 on some sort of device (smartphone or tablet or both) and one thing that has stood out like a sore "security" thumb was when it came to managing wireless (WiFi) profiles.
How many of you know how to get to your wireless configuration settings to add and remove specific wireless profiles?

For example, last year I traveled to a foreign country by plane. While I was in a DC airport waiting to board, I decided to connect to an airport pay-for-service WiFi on my iPad. I filled out the form and I was up and surfing. After a while it came time to finally board my flight and head off to my destination, but I had a 3-hour layover at another airport. So I decided to get on the Internet again, but this time it was a different service. However, this time it was free. So I decided to hook up all my other devices, such as Blackberry and Android tablets. So there I was, multitasking with all my electronics, until my next flight boarded. After a long day of traveling, I finally got to my destination, and like any electronic device driven person this day in age, I
connected ALL my devices to the Internet before I even unpacked the rest of my bags. 


After 10 days of fun I came back home and it was time to get back into the groove of things, work, 2+ hours commute and every-day life activities. While my vacation was now a memory relived through pictures, conversations and random thoughts, my devices had not been purged clean since they were holding onto the trip information still.

The good thing is that these "virtual" memories can easily be deleted. In fact, I highly recommend that you be paranoid and actively delete these memories from your devices. The main reason is in regards to wireless security, as related in my last blog.

Previously, I mentioned that your devices always beacon out looking for previous wireless
connections that are in your device profiles. Well in this story, I created extra wireless profiles on my iPad and on 2 other devices. Fortunately, I can delete these profiles on every device one at a time, except the Apple device.  I have many profiles on my devices and don't want to delete my home WiFi, my work WiFi or any other previously created WiFi profile on my devices. I just want to remove the ones that I know I will not use again.

So what I do is open my configuration settings on my devices and pick one profile at a time and delete it.  I do this on my Blackberry and my Android. However, the Apple device does not give
 me that option. The only option Apple devices give me is all or none...unless you are within range of said WiFi and the iPad (Apple device) detects the WiFi signal, at which point you can tell your Apple device to "Forget it" within your wireless configurations. So your only option if you use Apple device is to delete all the profiles. It is not so horrible, but just a burden and a best practice in order to keep maintain the security of your device.

So how many people do you think purge or clean their devices after they were done with an Internet connection they will probably not use again? I believe there are many people who don't want to deal with it, let it
 be and continue collecting WiFi profiles on their devices. I say to those people: Beware!
You really need to do a little cleanup with your devices every now and then and reduce your chances of getting owned.


Ernesto Fuller is the Senior Security Administrator for JHC Technology.  He can be reached at efuller(at)jhctechnology.com or connect with him on LinkedIn.

Friday, June 14, 2013

Save Money with a Wi-Fi Hotspot

With high cost to operate and use a Mobile device, such as a BlackBerry, we want to become accustomed to using the methods that keep charges down.  Everybody hates the large unexpected bill after a trip. If you are traveling or just nearing the end of your plan minutes for the month you may want to connect to a Wi-Fi hotspot. You may want to do this on a regular basis to keep your monthly usage low and stay away from experiencing any overages. A good practice is to turn off Mobile network and only turn on Wi-Fi whenever possible.  

I recommend you practice turning off the Mobile Network at home so you are familiar with how it is done once you find yourself in a Roaming situation.

Word to the wise;

  • If you make a call while connected with a Free Wi-Fi hotspot stay put until you are done talking.  Once you move away from the Wi-Fi hotspot your call will drop.
  • Before you travel internationally contact your carrier to ask “What is covered and what is NOT” while roaming. This could include your Internet email (Gmail, Yahoo and more).  This is considered data when roaming.  You are charged for roaming data even if you do not open the email account on your device. 
  • Ask about the cost to add International Data Roaming for one month, it may very well be worth the fee versus the surprise charges to your account afterwards.
  • Find out the fee for Instant messaging, SMS chat.
  • BlackBerry Messenger and Pin to Pin are both FREE
How to setup and connect to a Wi-Fi network

Before you begin, ask for the Wi-Fi name and password, if required. Most cafes and public places are starting to offer free wi-fi and generally require you to agree to terms of use prior to connecting. In other locations, it is becoming a common practice to secure the wi-fi network with a security key.  
You may also be provided security credentials (WEP, PSK, EAP-TLS etc...) in order to be connected. 
  1. From the Home screen,
  2. Locate and click the Manage Connections icon (For many mobile devices, this may be located in the Settings)
  3. Depending on the mobile device you will need to check the box for Wi-Fi and uncheck Mobile Network
  4. Your device will show a list of wi-fi networks, just click on the one you want to connect.
  5. If security key is required, you will be automatically prompted to enter it.
For Manual Setup:
  1. Select Set Up Wi-Fi Network > Other Ways to Connect > Manually Connect to Network.
  2. Type a profile name in the SSID field, type the name of the Wi-Fi network, Click Next.
  3. In the Security Type field, click the Wi-Fi network security type or credentials you have been provided.
  4. Click Save and Connect.
Just that simple, now practice.

Wanda Bannerman is the Mobile Architect for JHC Technology.  She can be reached at wbannerman(at)jhctechnology.com.

Tuesday, May 21, 2013

Securing Your Wireless Device?

Anybody who has ever connected to a wireless network has probably done this.
Hold on… let me take a step back. Today I am referring to "wireless" as your standard Wifi (aka 802.11, home network, free coffee Wifi) and not your cellular phone service.
One day you decided to get a wireless router. You set it up and you are off running. You connected your smartphone, tablet, laptops and any other wireless enabled device, but did you ever think how it works and what happens when you are not near your wireless network?
Here is a quick and dirty explanation. When you enable your wireless device, that device starts to call out for all the wireless networks you have ever connected to. These are invisible beacons going through the air asking where is “Linksys”, “Home Wifi”, “GoGoInflight” etc. If you get a response from any device saying that they are “Linksys,” or something else to which you have previously connected, you automatically connect as if magic.

There are several problems with this. First, your device beacons for every single wireless network you have ever connected to. Second, your device can continue to beacon even if you are already connected.
Think like a bad guy. There are many free applications out there that can see every device in their area that beacons. They even see the network the device is looking for. So now they can trick your device to connect to them. If your device does connect, they now have the possibility to pull information from your device, or worse, and this includes stealing bank, work, or e-mail passwords on the fly.

How do you protect yourself? First, turn off your Wifi on your device when it is not in use. Second, if you do connect to free (or paid) Wifi that is not from a trusted site like work or home, then don’t bank or browse to sensitive websites where bad guys can steal your information.
And since you turn your Wifi off, turn your Bluetooth off as well. Conserve your battery while you are at it.

Ernesto Fuller is the Senior Security Administrator for JHC Technology. He can be reached at efuller(at)jhctechnology.com or connect with him on LinkedIn